Thursday, May 21, 2015

Benched (Short Film) - Video Production

Short Film Creation!

Program (Final Cut Pro) used to create short film.


     Looking above, you may be wondering what that picture is showing. And for some, you may not be wondering because of the caption below that tells you what it is. But to go more in depth, me and my group of 5 people worked on a short film to finish off the school year. We were given a prompt that required you to include certain elements into the film. That includes: A hat, water bottle, "lights out" verbally spoken and lastly an intentional source of light.


Brainstorming process for film:

 
     Before starting the filming process for our short, my group had to brainstorm ideas for our film by story boarding, making a list (costumes, roles, schedule), and creating a script for our film. We grouped together and decided that we wanted a mystery film with suspense. The film is about a girl who is on a softball team and has two other friends who she is close with. One day while practicing, the girl finds herself on the ground and wakes up in the nurses office. She isn't completely sure what happens but knows that something is the cause for her accident. She must then put together the clues that she is left with from her flashbacks to figure out what happened to her that day. After filming, we individually edited our own video\ in Final Cut Pro.

Editing Process:

Editing shots in Final Cut Pro.
   
     The editing process for this video was fun and difficult. We used Final Cut Pro to edit parts of our filmed shots. The hardest part about editing was adding flashback effects and blinking effects to achieve the suspenseful look and since most of our filming took place outside, our some of our shots had windy noises which caused for distraction. Another hard part to edit was the audio. Our shots had different audio frequencies so some shots were filmed with low audio and some were filmed with high audio so the adjusting was hard. Overall I thought each individual edit turned out well.

Audio from shots.
Things to improve on / things done well:

    I thought some shots could use retake, especially the windy shots because it blocked out important audio. I also wish there was more time for nicer edits in the audio area. Overall, I think the majority of it was done well, we had creative shots and a great story line that included all components needed.

Things to pull for experience:

Different effects.
     Things I can pull from this experience is that cooperation is key to a good video. I also learned new effects and edits from this video, as well as color correction for fixing shots that were over exposed. I learned how to create a blinking effect using command P, dragging a clip to make the dark spacing appear then I set that in between clips to create the effect. Audio is important and its good to listen to audio on different computers if you get a chance because audio is different for every computer and you want to make sure the audio is equal. 

     Overall, I learned that setting your mind to something will help you achieve something.

Finished Video URL: https://www.youtube.com/watch?v=pCvx8XcITr0&feature=youtu.be
     

Avatar Bending (Animation)

The Four Elements: Water, Earth, Fire, Air.

   
     Some of you may know where this post is leading to and for some of you, you may be wondering what the title above represents. This title describes the animation/green screen avatar bending project that me and my group created. The project was a good way to end the school year and used all of our knowledge on animation that we had.

    The goals of this project was to firstly, find a group that you felt comfortable working with, discuss our ideas, create a story board, and figure out a way to film with the green screen and incorporate animation into it in some way. The theme my group chose was "Avatar the Air Bender" theme. 


Process of creation:

Using After Effects to key out green screen video and add background.
Using Maya to create rock and rock animation.
 
     The process of this project was somewhat long and required patience. In order to make this theme come to life, we knew that each group member would need an element. My group creatively came up with an idea to take an online bending test which would assign us our elements. Of course, I got Earth. After that we had to look at the movements for each bending style and practice the movements for the green screen shooting. We shot our green screen shots using key lights, spotlights, and LED lights so the green screen was well and lit up. After filming our every movement, we then needed to create elements accessories using Maya. For example, Earth needs a rock by their side that they can bend and Water needs water by their side that they can also bend. Since I was the "Earth bender", I had the job of creating my rock and the "Water bender" got to create their water. After using Maya to create those items each individual group member took their green screen video, keyed it out, and put a background in replace of the green screen to make themselves appear as if they were in a different area. We each also made a silhouette of ourselves to add a cool effect to the video. After completing the green screen video and rock, I had to then combine them by putting the After Effects rendered out video into Maya. I could then move the rock around and add key frames to make a animation of the rock moving with my movements. I got help with adding directional, key and ambient light to my scene to make the rock light up with the background color. Finally after completing all of these steps, I then rendered out the final product and handed it over to a group member to combine all of our clips into one and add in the recorded voice overs for each element.

What to pull from experience:

     
Rendered Earth Bending video (Not finished group project).
     I pulled a lot from this project, I learned how to work a green screen and correctly key it out. I also  learned how to import After Effect movies or images into Maya. I was shown how to make ambient, directional and key lights reflection on an object change color to match the color of the background so it has a comparison feel with the surroundings. But most importantly, I learned that cooperation is important in any group project. I also learned that the help from others are extremely important because you wouldn't be anywhere without the help of others.


Things to improve on / things liked:

     
     If I had to improve on something or do it differently, I would probably choose different backgrounds to go off of in our video and use moving ones if possible. I'd also use less key frames in the animating part of the rock because too many key frames caused the rock to sort of shake around and seem loose. Overall, I thought the project went well and had a unique theme to it. I wouldn't change anything else about the project if i could.


     This project was a fun opportunity and showed that you can really do anything if you set your mind to it. I hope to do more projects like this in the future and maybe even more complex projects.


Finished group "Elements" Project.


Thursday, December 18, 2014

Hammer & Nail (Animation)

The Silver Hammer!


     This project was one of the trickiest projects, just because the hammer wasn't just using plain old shapes but it involved a lot of extruding and changing the object into vertex mode to move every little dot and adjust the different shapes. A new tool we learned with this project was a type of extruding that is somewhat helpful.


Process of creating hammer:


Screenshot of  hammer rending in the Maya application.
     In order to create this hammer, I used some simple shapes but the hardest part of it was transforming the shape to get what you wanted. First I started out with a simple long rectangular prism which was used for the handle, I then combined lots of cubes for the top of the hammer and used the scale tool to stretch out the cube which made one side wider than the other. On the other end of the hammer, you have to use bevel and extrude/split the hammers end which formed a horn shape like antlers. You then changed the object into vertex mode and very carefully curved the so called antlers downward. This then formed the end of the hammer. You could add curves to the handle of the hammer using the bevel tool and selecting which parts of the handle you wanted to curve inward and outward. I then created a nail using a cone for the point, and two cylinders. I lastly added textures to the hammer and nail and platform to give it a outside type of feel.

     As always, I added directional lighting to add shadows to the hammer and nail and to light it up. Then I rendered out the image which showed what the lighting looked like when it was finished rendering.

What I learned:


*Learned how to use the bevel tool more efficiently

*Learned how to create curves in objects using extrude and bevel

*Learned how to add better lighting to objects

Extra screenshots:


The Poly Thing! (Animation)

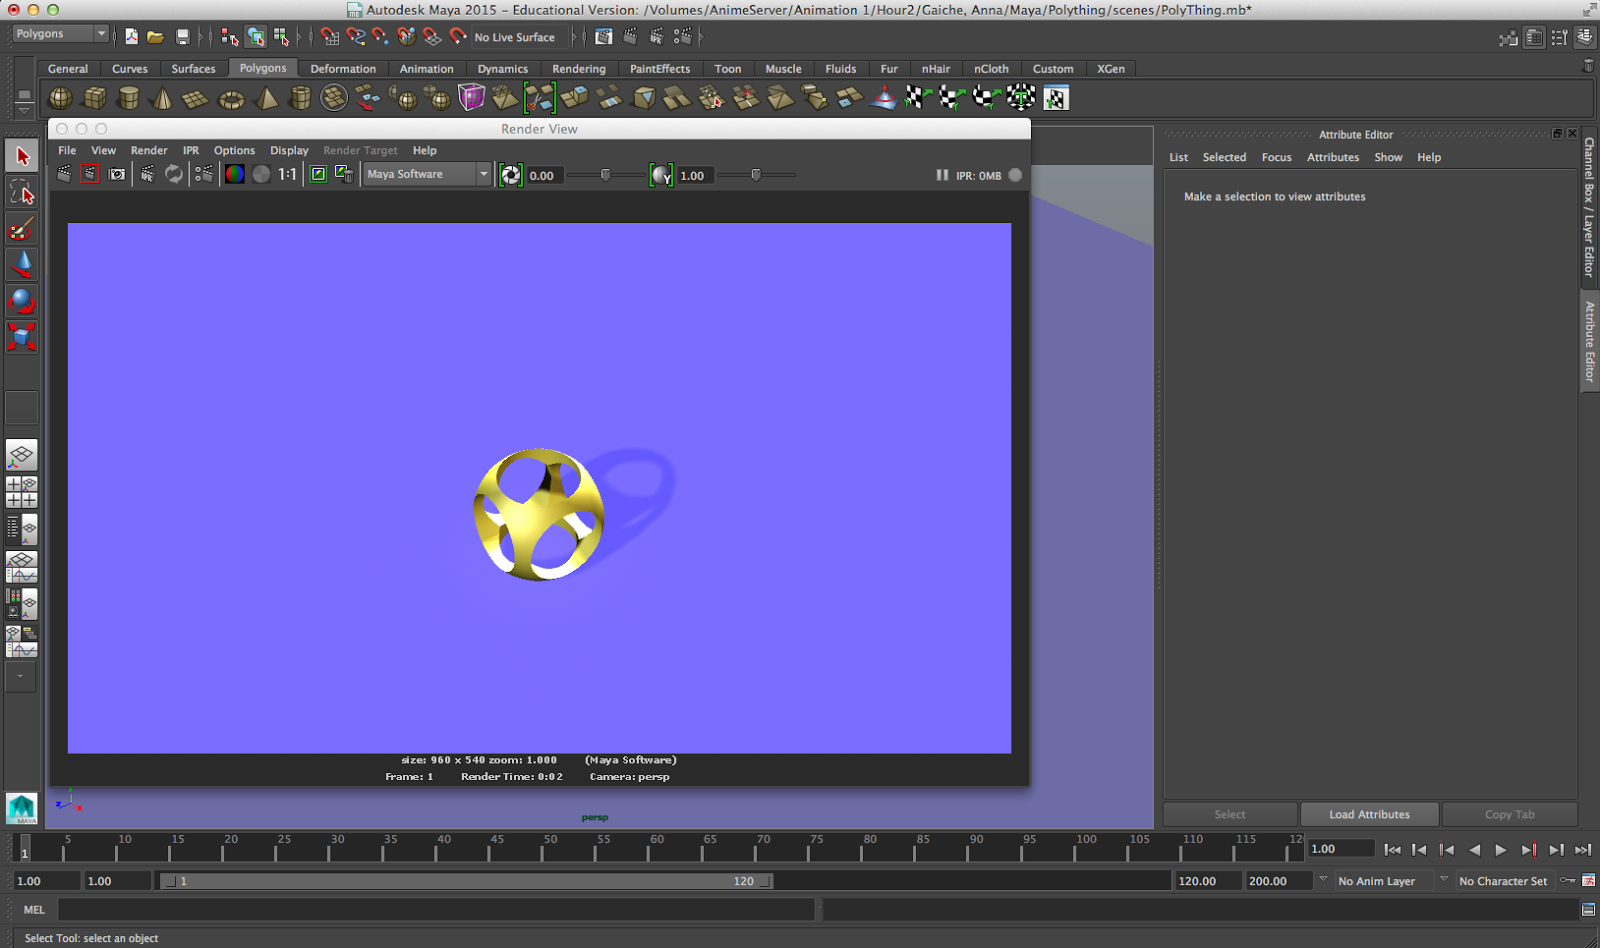
PolyThing


     The goal of this project was to create a poly thing. What's a poly thing? You may ask, well I'm not quite sure either. But I will most definitely describe what was need to create it.


Process for making the Poly Thing:  

    
      This project showed us how to use the difference option in the Booleans settings. It also used a lot of lighting as well. First I started off with a simple sphere, I then created three cylinders and aligned them in the center of the sphere. After that, I went to the different Booleans and selected difference and it created a sphere with six holes in it. When this object was created, I simply added a gold texture to it with a phong material to add a reflection and shine to the objects. Then I added a plane with a brighter color to make the object stick out when it is rendered out.
      
     Lastly, I added directional light around and inside the object to add shadows and light to the inside of the object so its not so dark inside.

What I learned:

 
     The main concept of creating this project was to introduce any animator to the lighting and differencing objects stage. These two concepts are very important when it comes to animation.

Extra screenshots:


Ice Cream YUM! (Animation)

Ice Cream Creation!


          This project made me a hungry animator. Our goal for this project was to make a simple ice cream scene with all the components of ice cream. For this project we used the application Maya and the simple polygons but we got to use some new tools in Maya as well, including bump mapping, and a new way of adding textures.

Process of making Ice Cream:

    
     I was given directions to create this lovely scene. This creation was pretty simple but required focus. First, I placed down two planes, one to act as the wall and the other to act as the floor. I then used simple shapes such as rectangular prisms and cubes to create the table where the ice cream sits. I then gathered 5 spheres and added a ice cream color to each of them (Strawberry, chocolate, and vanilla) then used bump mapping to create a bumpy texture on the spheres. I then created a bowl by using a cylinder and creating a smaller cylinder to difference them so it created a opening in the cylinder to make it a bowl of some sort. I fit 3 spheres in that one bowl. I then created a cone with the cone shape. With two round circular rings and 3 cylinders, I was able to create a stand for the ice cream cone. I fit two spheres on top of each other into the waffle cone. I added a cherry on top for extra decoration. The scooper was made by differencing 2 spheres and combining a cylinder to the end of the scoop. At the end of the handle, you add a sphere to finish it off.


     Those weren't the last steps of the creation though. I then had to add the textures to make the ice cream and accessories pop. You can simply do this by right clicking the object and selecting a favorite material. Those choices are lambert which gives off no shine or reflection, blinn which gives off some reflection and shine and then phong which gives off tons of shine and reflection, mainly used for metals. With the ice cream I used blinn and for the waffle cone I used lambert, and lastly for the metals I used phong. After adding the material, you can add a texture so that it shines as well. To finish the shapes off, I added a nice carpet to put in more detail.


     The last step of the project was to add directional light to make the shadows reveal themselves and add lighting to make the objects less dull. The types of directional light used was key light, and back lighting.

What I Learned:

    
     The overall project went well and was a success for me. It taught me a lot more about Maya, as any other project would usually do. This showed me how to add bump mapping to textures and better lighting.

More shots of ice cream:


The Taj Mahal (Not really)- Animation

Structure of Castle


 Recently, I've been working on a castle using the program Maya which is a very used program in todays animation businesses. For this castle, the main shapes needed to start it off was mainly polygons including rectangles, cubes, planes and cylinders. With those basic shapes, you can make a simple castle. If you have more time on your hands, you can make your castle more complex, I added a flag, water, mountains, scenery, and a planet that is shown in the next photo. I also added texture to make the castle pop out.

Castle Building process:

    
Wide shot image of finished castle.
     When building this castle, we were given a few instructions to follow in order to get a castle out of random shapes. Firstly I placed a place to be the castles support, just like a normal house on concrete for its support. Then I used two cylinders and duplicated them into two more for the four main corners of the castle. Next I used four rectangular prisms to form the four walls connecting to the cylinder shapes. Then using the extrude tool, you extruded the tops of the walls by adding subdivisions and selecting the faces to extrude which allows you to drag up or down on the one selected part of the object. Lastly you create a door which was probably one of the hardest parts of the process for me. Using a thin cylinder and rectangular prism, you would union them together using the Booleans. the first time you used it to combine the two into a door shape and on the second time you cut the shape out of the wall. And there you have a door. There are the steps to creating a basic castle.


Extra Steps:


     Since I wanted to take my castle a little more further than just a regular old castle, I decided to add a unseamed stone texture to my castle to make it pop. I then used a sphere shape and cone shape and combined them together to create a dome shape to add to each of the cylinders on the corners of the castle. I then did the same thing for the cylinder in the middle but I scaled it to a larger size so it would fit the cylinder. I decided to add a marble texture to those domes, just because I thought it would add good contrast and good colors to make the castle look like royalty. I then added a wooden texture to the door. To finish the castle off, I added a nice red flag using a cone and scaling its sides to form a thinner triangle and attached it to a very thin cylinder. What's a castle without an alliance?


Extra Wide image of finished castle.
     Sometimes a castle can look boring just sitting there on a plane with no landscape or surroundings. I added a cone under the plane for the castle just to be creative and make it look as if it was on a floating island. Then I surrounded the castle with water by adding a plane and a water texture to the plane. Using the extrude tool, I was able to add interesting mountains to surround the castle and give it that barrier look to make the castle seem like it had protect and good defense. For the last object that sits on the floating island, I had to make rocks by getting several spheres and making dents in them with a push in tool and then I stacked them at the end of the water flow. Lastly I created a simple planet using a sphere and adding a planet texture to it. Finally I added a background to set the setting of the castle which of course is in space!

     Everything I used was polygons, as simple as that. After the creation of this castle, I was able to understand the basics of Maya and animation as well.


Marina & the Diamonds- Radioactive (Music Video)

First ever music video!

Brianna Correa lying down and singing with song.
Radioactive
     
      I chose to do a music video over the song Marina and the Diamonds- Radioactive. This was a long and first time process. My group that was involved in the music video includes Sky Tripp, and Brianna Correa, with a little extra help from Anthony.


Filming Process:

    
Brianna Correa and Anthony fighting between their relationship.
     The filming process for this video was very interesting. We had to preplan by setting up a story board which shows all of the shots you are going to take and use to make your story. We also had to use a beat sheet that we wrote on once we figured out our song. With group projects comes difficulties and with difficulties comes a solution that is needed. My groups main struggles were trying to agree upon a song and story. there was quite a bit of misunderstandings and communication issues but soon we got it resolved. That was not the only issue. After filming most of our shots, we lost our SD card which had all of our clips on it so we had to restart and soon we found the SD card and lost a lot of time which caused us to get behind big time. Me and my group had to come up with a plan, so Sky chose the song and then we all came up with a story together and could start filming. Some of the old clips were still put to use in the video. Our story is about a breakup between a girl character and a boy character and the girl must forget about it and move on. The girl character is played by Brianna Correa, the boy character is played by Anthony. After the filming was finished, we could then edit. During the edit, we added the music in and had to mark up each beat of the music so we could line the clips up with the beats. Overall I thought my edit was fine but I feel as if it could have had a better story line.


What I Learned:


*The responsibility that is needed when you work in groups, as well as the communication.

*How make simple music video using final cut pro

* Time management is a very important skill that is needed in all projects and something that I can learn to progress on as more projects are to come.

     I think me, Brianna and Sky all learned tons of lessons that we can use to enhance our next projects. I feel like I learned to not judge or disagree upon something until you actually know how well you like something. At first this song was a little iffy to me but as time flew by, it became acceptable to me.

Video link to Youtube: